Overview
The 'Contact Summary' screen displays a summary of existing contacts, which can be viewed, edited, deleted or cloned as required.
|
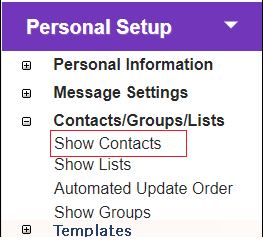
There are 2 ways to open the 'Contact Summary' screen:
1. Click 'Show Contacts' under 'Contacts/Groups/Lists' in 'Personal Setup' menu.
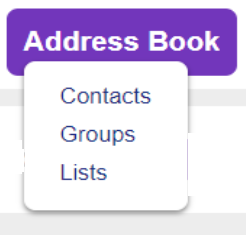
2. Click 'Show all contacts' or 'Show personal contacts' in 'Address Book' drop-down menu at top of the interface.
You can do the following from this page (click to jump to section):
•Create, import, or select personal/shared contacts
•Search Contacts - use filters to narrow your Contact Summary results
•Contact Summary - view, edit, delete and clone existing contacts |
Description
Contact Summary |
|
|
|
|
|
Choose 'All Contacts' or 'My Contacts':
•All Contacts - All contacts belonging to the parent customer will be displayed in the summary table.
•My Contacts - Only contacts belonging to the current user will be displayed.
|
|
Load contact summary.
|
|
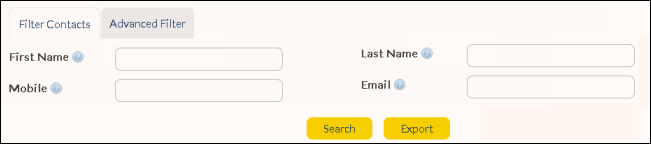
A "Search" button is available for Users to search for their Contacts. Clicking on the button brings up the search fields as displayed below. |
|
|
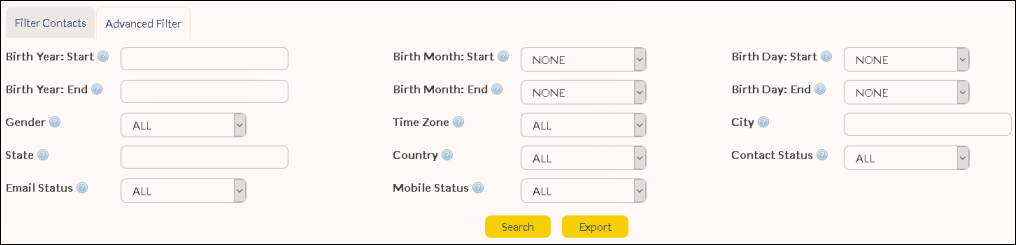
Enter any applicable search parameters in the 'Search Contacts' fields and click ![]() to quickly locate an existing contact.
to quickly locate an existing contact.
Go to Search for a Contact for detailed field descriptions.
|

The table fields allow you to view, edit, delete, or clone contact details, and send quick SMS messages (note: actions may be restricted to 'View Only' depending on the contact type and owner).
Click a contact name to view details or one of the following icons:
|
Edit the details of an existing contact. |
|
Delete the contact permanently (note: if the contact is also a AT&T GSMS user, you may not be able to delete their record. Only Customer Administrators have access to delete users).
|
|
Clone - create a duplicate of the selected contact details. This allows you to copy the main details of a contact, and adjust other details as needed.
|
|
|
|
If contacts are listed who are also StaffMatch employees, there will be no check box or 'Delete' icon visible on their row. This is to prevent accidental deletion of the associated employee record. |
|
If you wish to delete multiple contacts at the same time, tick the required check boxes and click.
|