|
<< Click to Display Table of Contents >> Edit an MMS Broadcast Template |
  
|
|
<< Click to Display Table of Contents >> Edit an MMS Broadcast Template |
|
Overview
Edit a stored MMS Broadcast template.
Choose a template by clicking its name in the 'MMS Broadcast Template Summary' screen.
|
The 'MMS Broadcast Template Edit' screen will be displayed.
Description
|
Summary
|
Name |
A word or number to identify the order in summaries and reports (not seen by message recipients).
|
Description |
Type/paste any extra descriptive information which might be useful.
|
Subject |
Specify the subject of the media if required.
|
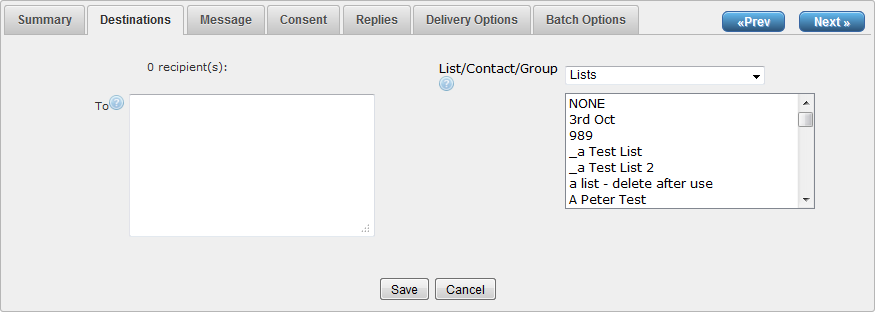
Destinations
|
To |
Type/paste mobile number(s) in international format. The field will convert numbers to the required international format if possible.
e.g. 12912345678.
You can add multiple destination numbers, 1 per line. There is no limit to the number of destination numbers you can add in this field.
e.g. 12912345678 12912345679
•How to personalize using Mail Merge (click to expand)
|
List/Contact/Group |
Choose pre-existing destination(s) for your message. Select 'Lists', 'Contacts' or 'Groups' from the drop-down list. Click here for information about lists, contacts and groups.
Left-click to select the destination list(s) / contact(s) / group(s). Ctrl + left-click to select multiple list(s) / contact(s) / group(s).
|
Message
|
This is where you specify the content of the message. Choose from the existing templates or create your own using SMIL (Synchronized Multimedia Integration Language).
MMS Message |
|
SMIL Template
|
Choose one of the existing templates from the drop-down menu, or choose 'CUSTOM' to create a template. Click here for more information about MMS SMIL templates.
The available default templates include:
•Audio Only
•Audio & Text
•Image Only
•Image & Text
•Video, Image & Text
•Video Only
•Video & Text
|
MMS Message Attachments |
Using existing SMIL template: Click 'Browse' to navigate and select your multimedia file(s). Click 'View' to preview.
Using custom SMIL template - Type/paste SMIL template code, then click one of the following:
|
|
Navigate and select a multimedia file to attach to the message.
|
|
Undo any changes and exit.
|
|
Remove the selected attachment from your message
|
|
Preview the selected attachment.
|
Consent
|
Outbound Filter Type |
The options in this drop-down menu are:
•NONE
•BLACKLIST - Messages will only be sent to numbers that do not appear in the chosen list (see 'Outbound Filter List' field). If you need to comply with Spam Act requirements then you would most likely choose 'Blacklist'.
•WHITELIST - Messages will only be sent to those numbers that are contained in both your destinations and the chosen whitelist.
The lists are filtered to present only 'Text' type lists and not 'Upload' or 'Automatic'.
|
Outbound Filter List |
Select a list from the drop-down menu. This is the blacklist or whitelist that will be used to filter messages.
|
Replies
|
Reply to Address Type |
Select from the drop-down menu. If a recipient replies to your message, this is the method by which it will be received.
•EMAIL - Reply is sent to both a nominated email address and directly into AT&T GSMS.
•INBOX - Reply is received directly into AT&T GSMS platform - not email inbox. Received messages can be viewed in Messages section.
•MOBILE - Reply is sent to both a nominated mobile number and directly into AT&T GSMS.
•URL - Reply is sent to both a nominated web address and directly into AT&T GSMS.
|
Reply to Address |
Type/paste the reply email address, phone number, or URL . If 'INBOX' is your Reply to Address Type, this field is not required (replies will go straight into the messages inbox within AT&T GSMS.
|
Delivery Options
|
Delivery Frequency |
Select from the drop-down menu. This is how often your message will be sent.
•BI-WEEKLY - Every 2 weeks
•DAILY - Once per day.
•HOURLY - Once per hour.
•IMMEDIATE - Once.
•MONTHLY - Once per month.
•ONCE - Once (at a future date and/or time).
•WEEKDAY - Once per weekday.
•WEEKEND - Once each weekend day (usually Saturday/Sunday however this may be configured differently for different nationalities).
•WEEKLY - Once per week.
•LIST_TRIGGER - Automatically sent upon retrieval of a list. Click here for more information about message triggers.
|
|
If a recipient opts-out from receiving messages after an order has been scheduled, the scheduled message will NOT be sent to them. |
Start Date |
Click
e.g. if 'Delivery Frequency' is 'MONTHLY' and 'Start Date' is '01/09/2012', the message will be delivered on the first day of each subsequent month (01/10/2012, 01/11/2012, 01/12/2012 etc).
|
Start Time |
Type/paste the time when you would like the message to be sent. If your message is recurring, it will always be sent at this time of the day.
|
End Date |
Click
|
End Time |
Type/paste the time when you would like the final message to be sent (format HH:mm).
|
Validity Period |
Select from the drop-down menu. Queued messages will not be sent after this amount of time.
Options:
•1 Day
•1 Hour
•12 Hours
•14 Days
•2 Days
•2 Hours
•30 Days
•4 Hours
•7 Days
•8 Hours
•Always Valid
|
Priority |
Select from the drop-down menu. If you are running more than one campaign at the same time, this field determines the order in which they will be launched.
e.g. 'Order 1' is assigned priority '1', and 'Order 2' is assigned priority '2'. Both orders are launched at the same time. 'Order 1' messages will be sent first.
|
Timezone Open Hours |
Select from the drop-down menu. Click here for more information.
|
Handset Profile |
Select from the drop-down menu (if enabled) or choose 'NO'.
|
Registered Delivery |
Click check box to receive confirmation that a message has reached its destination(s).
The delivery receipt message will be delivered to the platform inbox.
This field can be pre-populated by flagging the 'Registered Delivery' check box in Company SMS Preferences (Customer Administrators only).
|
Source Address
|
Allows user to present any of their available addresses or alpha-tags as the broadcast sender.
This field is not active if the 'Append Opt-Out Message' check box is ticked in the 'Consent' tab. This prevents any conflict if an alpha-tag is selected as the source address, since replies can not be sent to an alpha-tag source.
|
|
Note: If you select monthly, and the start date is the last day of the month, then the platform will launch subsequent orders on the last day of the given month, regardless of the date.
e.g. Start date - 31 January 2012 Next monthly delivery date - 29 February 2012 |
|
Note: The service checks for, and executes new orders in 5 minute intervals. |
Batch Options
|
This feature allows you to control the rate at which messages are delivered.
e.g. if your message contains a prompt to call a phone number, you may want to stagger the delivery of the messages so that your phone system is not overloaded with calls.
Batch Size
|
Edit the batch size here.
|
Batch Interval
|
Edit the interval between batches here.
|
Maximum Messages
|
This feature is useful if you are not sure how many recipients there are in a list but you want to limit the number of messages sent so that you don’t exceed your broadcast budget
|
Once all required fields are complete:
|
Store changes and exit
|
|
Discard changes and exit. |