Let's set-up a Call Control Object (CCO) for using AT&T GSMS Voice Messaging our next IVR campaign. We've provided an example in Voice Messaging - Call Control Object section that will help you understand the function of Call Control Object. Creating CCO involves two steps:
•Creation of Call Control Object
•Adding Call Control Actions to the Call Control Object
Create Call Control Object
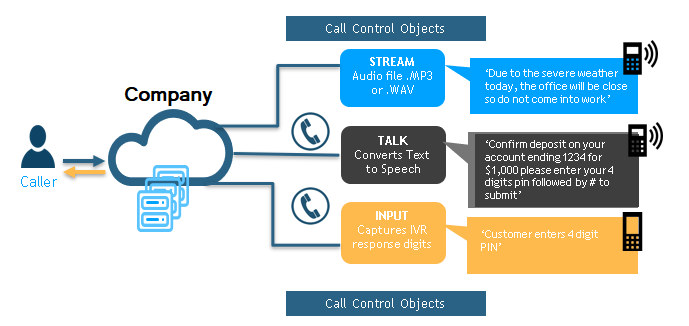
Voice CCO Flow
Below's a little diagram depicting the flow of how CCO is used to send out Voice message.
1. Select Create Call Control Object from the Voice menu options :

2. Enter Name and Description of the Call Control Object and click Save.

Name |
Enter a short and unique name for the Call Control Object. |
Description |
Enter an optional description to identify the Call Control Object. |
3. As soon as CCO is saved, window will display a Call Control Actions section, with a plus ![]() icon on its menu bar.
icon on its menu bar.
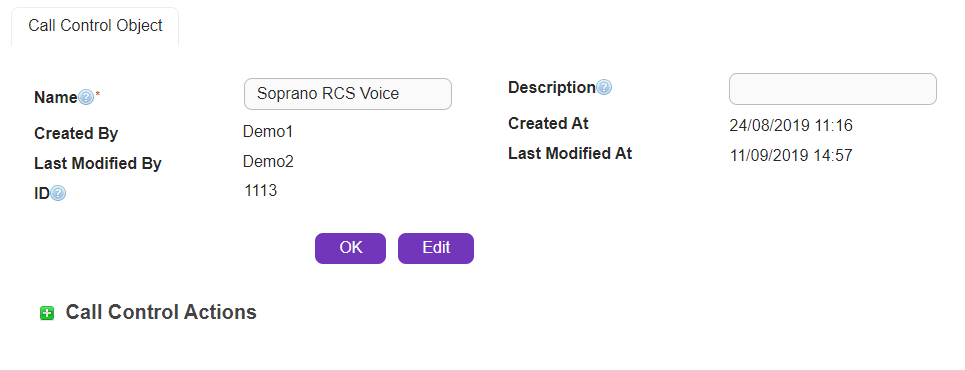
Note - Please make a note of the Call Control Object ID (Example 1031) as they are utilized while sending Voice calls using Voice Messaging APIs.
Add Call Control Actions
For our example, we will set three actions - STREAM, TALK and INPUT. We intend to get the following voice outcome:
a) Welcome message playing audio file, using STREAM
b) Typed in text will be read out, asking users to enter the PIN, using TALK
c) Users must enter the PIN , using INPUT
1. Now let's add the action to the object we just created in the above section. Click on ![]() button on Call Control Actions menu-bar and begin creating your action :
button on Call Control Actions menu-bar and begin creating your action :
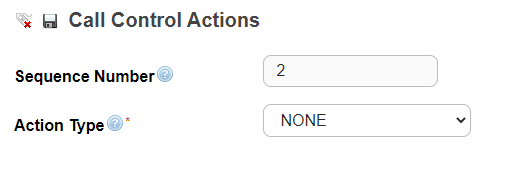
Below fields appear on the screen:
Sequence Number |
Indicates the sequence of the call control action. For example, the action with sequence 1 will be executed before sequence 2. The action types must be arranged in the right sequence for the IVR to generate an expected outcome.
|
Action Type |
Sending a voice request with a call control object ID will invoke the object and the linked call control action. Linked action could be one of the following:
•Input - Allows users to enter digit inputs and sends back to the system for recognition.
•Stream - Allows you to select a pre-recorded audio file in mp3 or wav format
•Talk - Reads the text content as typed in by the user. Password text can be customized so that it can be read with case-sensitive pronunciation.
Important: Input should always be the last action type. Any action added after Input is not recognised by the system. |
2. Click on Action Type drop down menu to see below options:

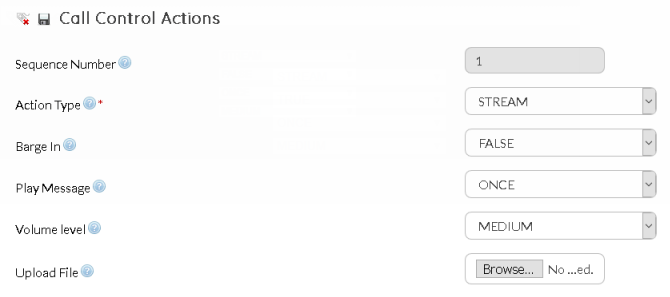
3. Select Stream as Action Type. On selection of Stream as Action Type, following fields appear on the screen:
Barge In |
Allow users to interrupt voice audio in the call in between by pressing a button on the keypad. Options:
•True - Allows recipients to stop the audio from playing any further by pressing a button the keypad •False - Default, Recipient cannot stop the audio from playing unless it finishes by itself
This option is particularly useful to the recipients when the audio played is familiar to them. Note that if this field is set to True, the next Call Control Action must be Input.
|
Play Message |
Number of times action is repeated before executing the next action. Options:
•Indefinitely •Once (default) •Twice •Three times
|
Volume Level |
Volume level of the played speech. Options:
•Low •Medium (default) •High
|
Upload File |
Upload the audio file that needs to be played in the voice call. Supported formats include MP3 and WAV. Please ensure that file is readily available on your local drive while setting up the stream - call control action.
|
Note that all above fields are optional and if not set, defaults values will be processed by the system.
Once you have added the fields as explained above, hit Save icon on the Call Control Actions menu-bar. Call Control Action with Stream gets saved:
4. Now let's setup next action item. Repeat step 1 & 2 and move to step 5.
5. Select Talk as Action Type. On selection of Talk as Action Type, following fields appear on the screen:
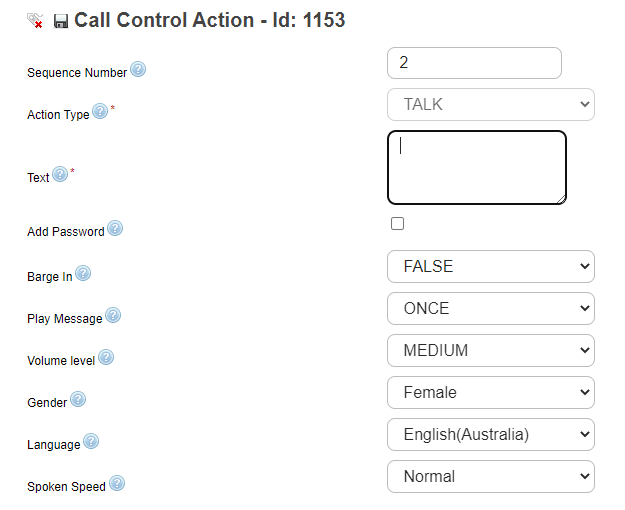
Text* |
Add the text that would be converted to voice on the call. Maximum limit:1500 characters. A comma in the text will add a short pause in the call.
Please note, if 'Add Password' check-box is enabled, this text will be util<%IS%>ed as text spoken before the password.
|
Add Password |
Enable the check-box to provide password text. If this parameter is enabled, below options appear on the screen:
•Password: Type in the password that needs to be spoken over the voice call •Text After Password: Type in the text that needs to be spoken after the password •Password Spoken Speed: Enter the speed of speech for password text. Options : Normal, Slow & Extra Slow(default).
|
Barge In |
Allow users to interrupt voice audio in the call in between by pressing a button on the keypad. Options:
•True - Allows recipients to stop the audio from playing any further by pressing a button the keypad •False - Default, Recipient cannot stop the audio from playing unless it finishes by itself
This option is particularly useful to the recipients when the audio played is familiar to them. Note that if this field is set to True, the next Call Control Action must be Input.
|
Play Message |
Number of times action is repeated before executing the next action. Options:
•Indefinitely •Once (default) •Twice •Three times
If you select option other than Once, system providing optional field for adding 'Repeat Message Interval'. This option would let you add intervals between repeated messages. Available options are :
•1 second •2 seconds •3 seconds •4 seconds •5 seconds •10 second
Note - Repeat message interval option is only available for Talk. |
Volume Level |
Volume level of the played speech. Options:
•Low •Medium (default) •High
|
Gender |
Select male or female voice.
|
Language |
Select language options - Spanish, Portuguese or English (default).
Please note, text typed in English will not be converted to Spanish automatically. Sender must select appropriate language options, compatible to the text characters.
|
Spoken Speed |
Enter the speed of the speech. Options:
•Normal(default) •Slow •Extra Slow
|
Note that apart from Text, all above fields are optional and if not set, defaults values will be processed by the system.
Once you have added the fields as explained above, hit Save icon on the Call Control Actions menu-bar. Call Control Action with Talk option gets saved:
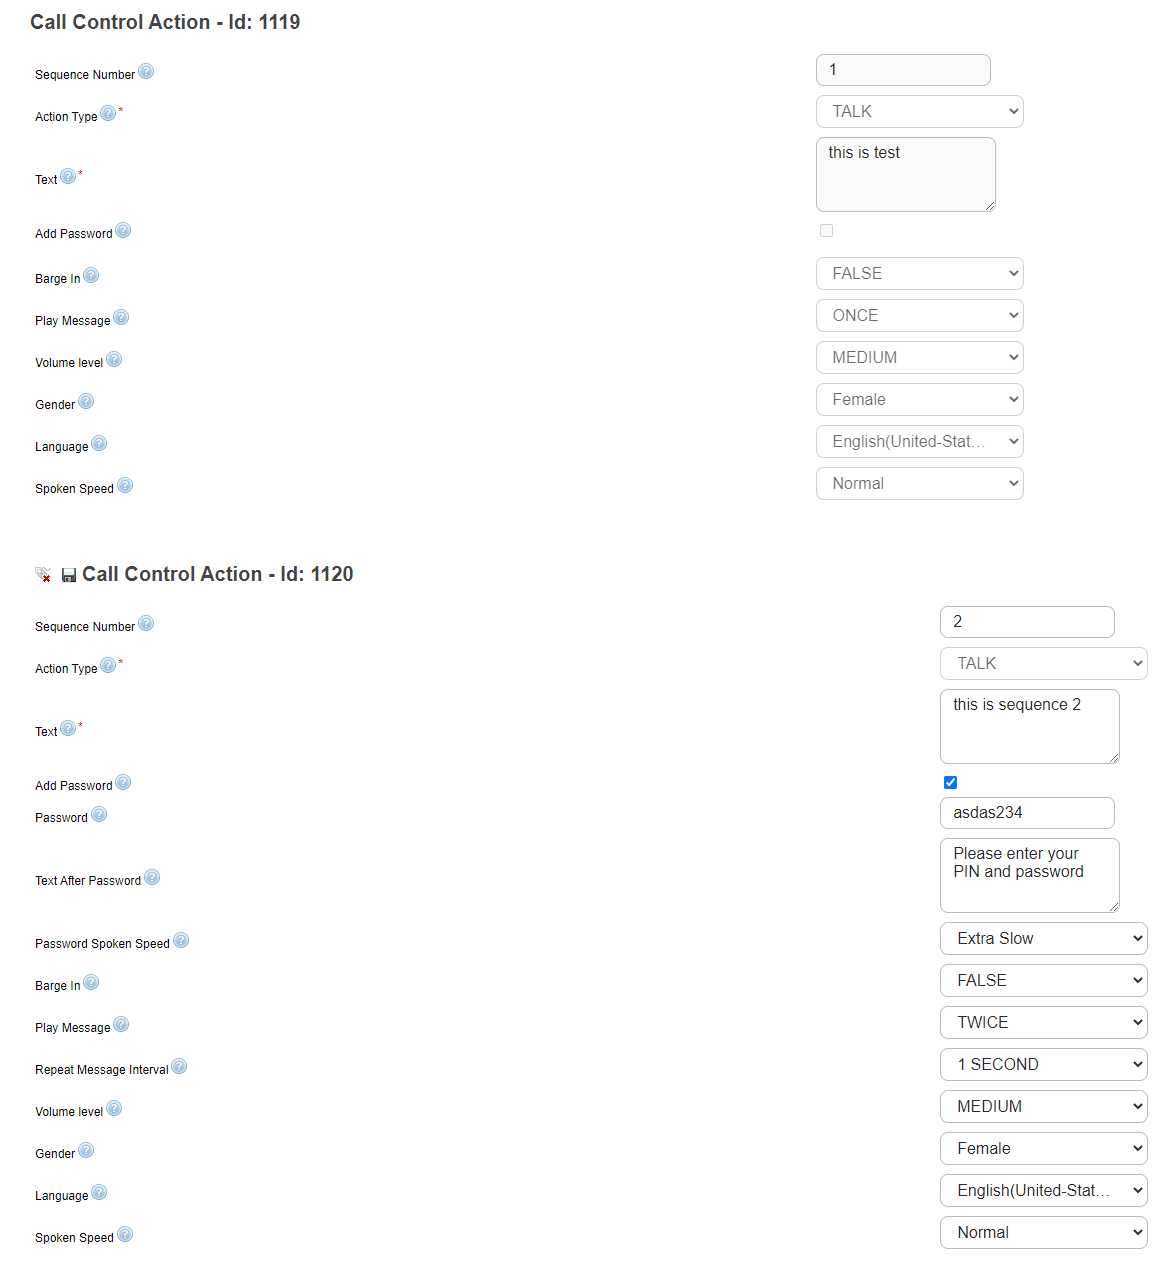
Notice the sequence number in each Call Control Action. When a voice call is triggered with a this object, the actions configured inside them will be executed in the sequence order.
6. Now let's setup last action for this Call Control Object. Repeat step 1 & 2 and move to step 7.
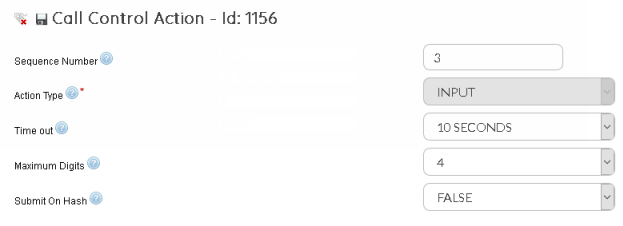
7. Select Input as Action Type. On selection of Input as Action Type, following fields appear on the screen:
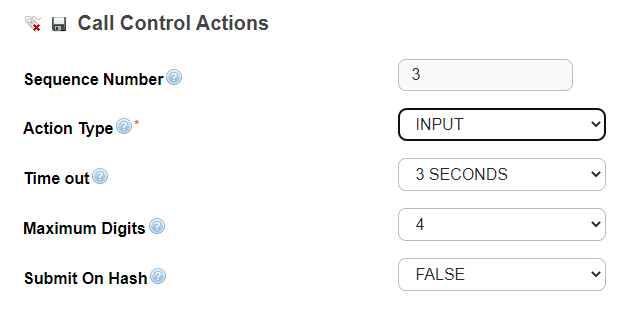
Time out |
Result of the callee's activity is retrieved seconds after the last action. Options:
•3 seconds (default) •10 seconds •15 seconds •20 seconds
|
Maximum Digits |
Number of digits a recipient can press on keypad. Maximum value supported- 20. Default number of digits - 4.
|
Submit On Hash |
Enable this option to give control to the recipient to send their inputs by pressing hash (#). If this option is disabled, result will be sent out after Time out value. Options:
•True •False
|
Note that all above fields are optional and if not set, defaults values will be processed by the system.
Once you have added the fields as explained above, hit Save icon on the Call Control Actions menu-bar. Call Control Action with Input option gets saved:
Notice the sequence number in each Call Control Action. When a voice call is triggered with a CCO object, the actions configured inside the CCO will be executed in the same sequence.
Next Steps
As explained in above section, we have set up a Call Control Object including all three actions - Stream, Talk & Input. You can launch a Voice order and invoke a preconfigured Call Control Object as explained in New Voice Order > Call Control Object.
Note that you can even setup Call Control Object utilising only a single or any combination of Call Control Actions (Stream/Talk/Input).