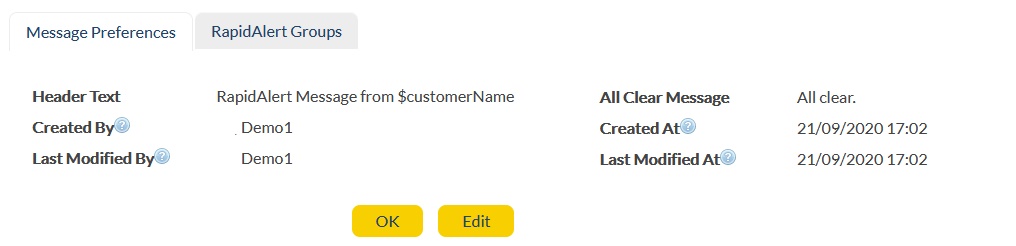
The Message Preferences enables you to set up your RapidAlert Header Text and All Clear messages. You would see the below screen with fields that are discussed below:
|
|
Header Text: |
This text will be added at the top of the RapidAlert messages that are sent. It is advisable to keep this text short as it will be added to the alerts. Example, "RapidAlert Message from $customerName". Set of supported parameters are listed below.
|
|
All Clear Message:
|
This text is sent when the user clicks on 'Send All Clear' button to inform the recipients about incident closure. It can only be configured here, in message settings and cannot be edited while sending the RapidAlerts. To understand the usage of 'All Clear' option, refer to RapidAlert - New RapidAlert -> Monitoring and Status Control of RapidAlert -> Step4. |
|
Created By: |
Account that was used for creation.
|
|
Last Modified By:
|
Account that was used to modify it last. |
|
Last Modified At:
|
Time-stamp when it was last modified. |
|
|
Confirm and exit.
|
|
|
Modify details. |
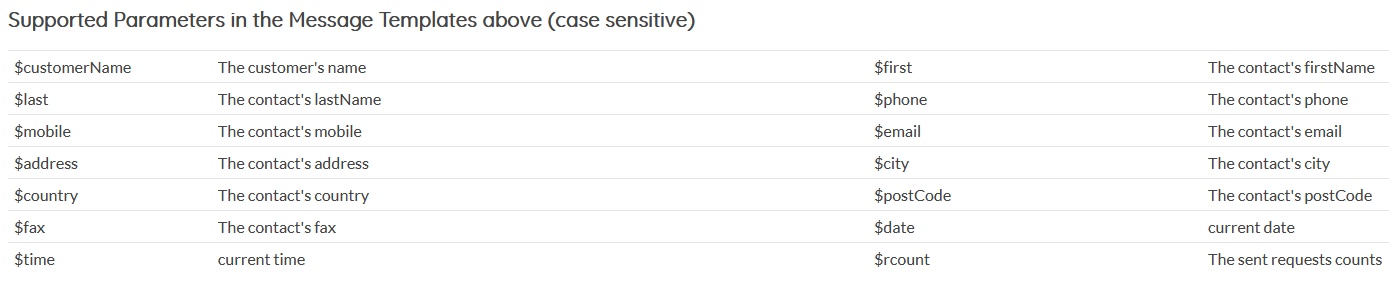
We support mail-merge parameters in the message template above. All these parameters are case sensitive :
$customerName: |
This variable can be used to put your company name in this text .
|
$first |
This variable can be used to personalize the message by retrieving first name from the contact records.
|
$last |
This variable can be used to personalize the message by retrieving last name from the contact records.
|
$phone |
This variable can be used to put the phone number of the contact in the text.
|
$mobile |
This variable can be used to put the mobile number of the contact in the text.
|
This variable can be used to put the email address in the text.
|
|
$address |
This variable can be used to include contact's address in the text.
|
$city |
This variable can be used to include contact's city in the text.
|
$country |
This variable can be used to include contact's country in the text.
|
$postCode |
This variable can be used to include contact's post-code in the text.
|
$fax |
This variable can be used to include contact's fax in the text.
|
$date |
This variable can be used to include the date in the text.
|
$time |
This variable can be used to include time in the text.
|
$rcount |
This variable can be used to include the nth counter of the message triggered i.e. displaying how many alerts have already been sent. This is useful in case of using resend functionality. |
Setup Steps:
1. Message Preferences View: You should be able to view the message preferences tab as shown in the above screen and the fields that are discussed in the above table.
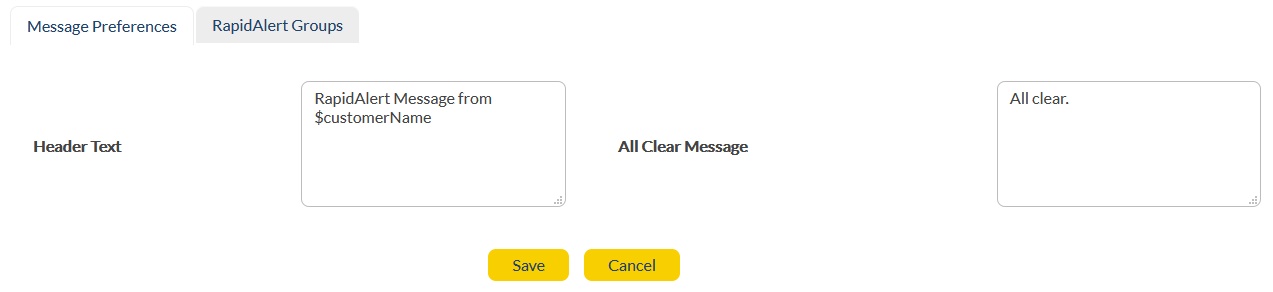
2. Begin Edit: Click on the ![]() button. The below screen should appear:
button. The below screen should appear:
|
|
3. Header: The 'Header Text' is the editable text that will appear on the RapidAlert Message Header. This can be set up as per the requirement.
4. All Clear Text: All Clear Message is sent when the emergency is over. The admin will send a quick message to all recipient to inform about the closure using the 'Send All Clear' button. The message sent can be configured using the above settings. All clear messages can be customized at the time of RapidAlert Template creation. Users have the option to choose the "From Preference" option that presents the default pre-configured "All Clear" message set at Message Preferences, or users can choose the custom option and provide a new customer All Clear Messages like:
"Employees of XYZ_Global. Please be aware that the fire incident has been resolved. Kindly process to your nearest exit in an orderly fashion".
5. Save Settings: Once the information is entered, click ![]() . You will be taken to the Message Preferences home screen with the updated details available on the screen.
. You will be taken to the Message Preferences home screen with the updated details available on the screen.
6. Discard: If the user wishes to discard the message, click ![]() . You will be taken to the Message Preferences home screen.
. You will be taken to the Message Preferences home screen.