Overview
Import Authenticator token details from a CSV file.
|
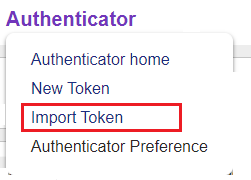
Click the 'Authenticator' tab at the top of the interface to open the Authenticator drop-down menu.
Click 'Import Token' to open the 'Token Import' screen. |
Description
Create .csv File
Before you can import tokens, you must create a .csv file in Excel which contains all the required information.
Open Excel, and add token information.
|
There must be no more than one value per cell. Each row represents one token; each column represents a field in a new token record in AT&T GSMS. Include all mandatory information, and any optional information.
Any of these values can be included as a column in your .csv file.
Token Information
Identifier
|
A unique key that is used to identify the token.
|
Name
|
Descriptive name for the token.
|
Mobile
|
Mobile number associated with the token.
|
Status
|
Choose 'DISABLED' or 'ENABLED'.
|
Description
|
Any other useful descriptive information about the token.
|
|
Email address associated with the token.
|
Once you have typed/pasted all the information you want to import, save the spreadsheet as a '.csv' file type.
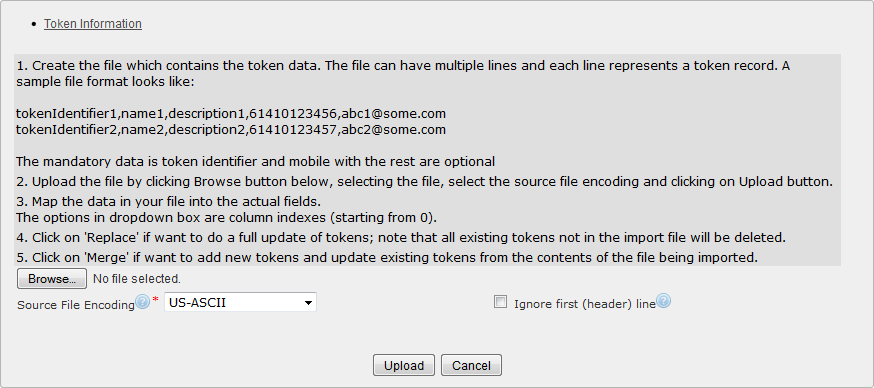
Upload .csv File
|
Locate and select the saved .csv file on your local or network drive.
|
Navigate to find a file on your computer or network.
|
Source File Encoding
|
Default is 'US-ASCII', which supports all English characters. Select an alternative if you need to support international/foreign characters.
|
First Line is Header Line
|
Tick this box to ignore the first line of your .csv file when uploading (e.g. if first line contains column headings and not actual token data).
|
Once all required fields are complete:
|
Begin importing data.
|
|
Discard changes and exit.
|
Once uploaded, map the required information from your file to the matching fields.
Once all required fields are complete:
|
Remove all existing data and replace with the imported file.
|
|
Keep the existing data and add only new data from the imported file.
|