|
<< Click to Display Table of Contents >> Getting Started with the SMPP Interface |
  
|
|
<< Click to Display Table of Contents >> Getting Started with the SMPP Interface |
|
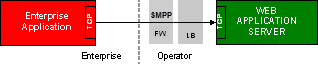
The following is a quick guide to assist you getting started with the simplest form of sending an SMS message with SMPP API development.
Prerequisite
You must have requested access to the SMPP interface to be provisioned when filling in the order form.
Step 1: Provision your SMPP API Access
Request the SMPP API Access to be provisioned against your account.
•Specify the user's 'Alias' - this will be used for the SMPP API Access/Authentication.
•If you wish to lock your SMPP API Access down to originate from a particular host or set of hosts, please provide this information when requesting your SMPP API access provisioning.
Step 2: Configure Your SMPP Application
Once your Service Support Team or Account Executive has confirmed that this has been provisioned for the specified user, you can start using the service.
AT&T SMPP Configuration Parameters:
|
Further information can be found in SMPP Interface Developer Guide available from your account representative.
Step 3: Test your physical connectivity
From your SMPP client's command line, attempt to connect to the SMPP server to validate your physical access is available.
If you do not receive the 'Connected to na1.smartmessagingsuite.com' address message then there may be firewalls blocking access between your server and the SMPP server.
# telnet na1.smartmessagingsuite.com 2775 |
Expected result is:
Trying <IP address>... Connected to na1.smartmessagingsuite.com. Escape character is '^]'. |
Step 4: Test your SMPP connectivity
Once you have confirmed your physical connectivity is in place, attempt to establish your bind from your SMPP Client.
Step 5: Additional Support
Additional support and information for API and interface development:
•Support teams
•SMPP Interface Developers Guide
•Online Help